How to Make a Youtube Channel Art With Photoshop
How-do-you-do and welcome, Today the Grapocean tutorial topic is how to make a professional youtube banner template in Adobe Photoshop. In this tutorial, I will requite y'all diverse ideas about youtube banner designing. Today I volition prove you how you tin can create cute youtube banners using just Photoshop. If you follow this tutorial, I promise yous can design a banner like this. So let's start the blueprint process without delay.

Some Important Guidelines Regarding This Tutorial-
ane Dimensions - 2560x1440 (artboard size)
2 Resolution : 300 DPI
3 Color Style - RGB
iv Template type - PSD
Tutorial Stock Files-

Usually, I volition explain the whole of the tutorial in detail but in this instance not showing the process of creating a design artboard because, in another tutorial, I have described in detail how to make a youtube banner artboard with the proper size. You lot must read this commodity too to understand the consummate design process.
Nonetheless, subsequently created the design artboard. I will bring all the stock images that I have used in this tutorial from the computer bulldoze. Concord Alt+Ctrl+Shift and press O. Or agree Ctrl and printing O from your keyboard to open up the stock photo in photoshop. After opening the stock photos, drag and drop them on the design artboard. First, we drag the groundwork photo after that the model photo. Subsequently bringing the groundwork image, adjust information technology to size past pressing Ctrl +T. Or, get to Edit > Gratuitous Transform. Make sure the background prototype is covered the whole blueprint artboard. Then become to Filter> Mistiness> Surface Mistiness to fade the groundwork border.
Now we will make the background a fiddling bit darker. To exercise this, nosotros will create a Solid Colour Fill layer by clicking the Brawl (create new fill up or adjustment) icon. After that, change the fill color to black. Then click on the Layer Mask of the color fill up layer to the active layer mask. Then click on the Brush Tool and selection a soft round brush and tab on the background. Make certain the Foreground color is black. And the layer mask colour is white, and the castor opacity is 38% to get the perfect result.

At this stage, we volition apply surface blur on the background and then that its border becomes fade. To implements, this effect clicks on Filter from photoshop's summit carte bar, and then become to Blur and click on Surface Mistiness and then make it Radius 46 pixels and Threshold 90 pixels, then click on Ok.

In this step, I will bring the model photo and put it in a round shape. And then here I drag the model photograph and drib it in on the pattern artboard. Then I create round shapes using Ellipse Tool. When you lot make the ellipse shape, you can pick any color you want. After that, make three copies of the Elipes i shape by press Ctrl+J three times. Yous can see in the screenshot these three layers names created respectively, "Ellipse 1" "Ellipse 1 re-create" and "Ellipse 1 copy 2" when you copy them.
Now I transform those 3 shapes into unlike sizes and align them in the heart of the design artboard. Now I volition apply some drop shadow furnishings under information technology and reduce the Fill up from 100% to x% except the meridian ellipse shape layer Because we volition identify the model picture inside the pinnacle ellipse layer. Now, keep the model photo layer at the meridian of all ellipse shapes, and make a clipping mask with the "Ellipse 1 copy" layer. Move your mouse cursor over the model image layer and concord Alt+Ctrl+Shift. Then you will see a down arrow sign visible, so click on it to make a clipping mask.

In this step of the tutorial, we will make bust particles effect around the model circular shape. To do this, I create a blank layer by click on the small plus icon box. So I click on the brush tool then I chose a dust castor from the brush console. And run this brush where we demand the grit particles issue. Now make a layer mask of the round shape "Ellipse ane copy" that we apply to a clipping mask. Now actuate the layer mask past clicking on the white box. Now click on the Foreground colour box. Subsequently that, change the foreground color to black . At present run the dust particles castor inside the round shape. To erase the round shape, according to the dush particles.
Now nosotros will brand a triangle shape. To brand a triangle shape click on Polygon Tool and brand its Sides three and click on the artboard. Afterward that, a dialog box opens, then put the Top and width size of the triangle shape, and click on Ok. Later on that, turn off the Fill color of the triangle and turn on the Stroke fill. Brand the stroke size around five pixels. Now put the layer backside all round shapes.
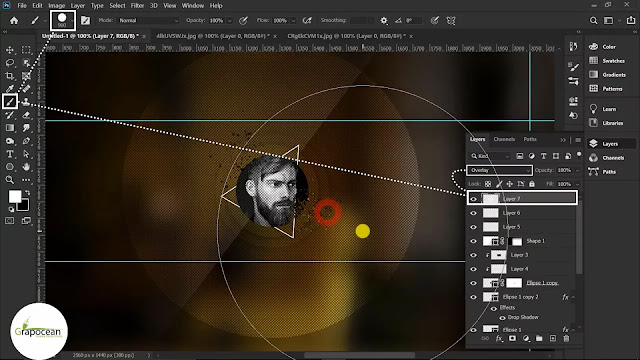
At this phase, we will make a circular blueprint effect. There is ii way, to make this pattern. The first way- drow a round shape using the Ellipse Tool then, go to its Layer Manner Window>Pattern to apply it. Or you tin can brand a round pattern brush and then use your brush to brand the round pattern. However, here I apply the brush tool. When we make this round pattern, using the castor tool, make sure the brush's Foreground color is white . Then make a new blank layer and tab the brush one time on the artboard. Later on creating the round design, we volition change the layer mode Normal to Overlay . And this fourth dimension, I practise the same piece of work as I did making the pattern issue.

Nosotros have reached the very last stage of the tutorial. In this stage, I create all text layers and align them in the right place. To practice this, I use the type tool and write all the text. And I brand some push button shapes also. For making subscribe button shape, I utilise the Rounded Rectangle Tool and make a shape with yellow color.
And for the social icon, I use the Ellipse Tool and brand a circular shape. After that, I double-click on the layer to open up its layer-style window. At present, I checkmark the Gradient option and choose a dark gradient color. And then, I checkmark the Stroke pick and proceed the stroke size 1px. And use a similar dark gradient as the stroke color. After that, I checkmark the Drop Shadow option and change the drop shadow color from black to yellow. Then I turn the alloy style of the drop shadow Normal to Hard calorie-free and increase the drop shadow size to 29px. After that, I clicked on Ok. to go the glow outcome nether the round shape. And so I make three copies of that layer and align them perfectly. Later that, I put the social icons on it.
Thanks for reading this article then patiently. If you like the tutorial, delight share it with your friends and read my other post also. Meet yous later till then take care.
schumanwhimen1991.blogspot.com
Source: https://www.grapocean.com/2020/09/how-to-make-professional-youtube-banner.html
0 Response to "How to Make a Youtube Channel Art With Photoshop"
Post a Comment